

If you’re not utilising the Ninja Forms plug in on your WordPress website, you could be missing out on a crucial opportunity to turn your site visitors into sales. Forms enable your customers to easily reach out to you and enable you to gather important customer contact information with just one click. These instructions lay out the steps to adding pop-up forms to your website so that customers can contact you without leaving the page, which is vital in converting leads into sales.
How to create a WordPress Popup form with Popup Maker
There are lots of plugins that you can download to help you create popups for your website. Popup Maker, however, is by far one of the best because of its straightforward menus and many versatile uses.
The development teams behind both Ninja Forms and Popup Maker work together to ensure that your WordPress forms and popups integrate seamlessly for an ideal experience not just for your website visitors but for you!
Step One: Add Popup Marker to your WordPress website

From your WordPress dashboard, go to Plugins > Add New, and search for Popup Maker. Once you’ve located the Popup Maker plugin, click install and activate the plugin.
After installation, you will find a new tab for it in your dashboard. From this tab, you can select whether you want to view previously created popups, add new ones, change your themes, etc. For now, select “Add Popup.”
This will open a page where you can name your popup, assign a title, set conditions for the popup, when it will trigger, set the theme, publish, etc. For the time being, let’s just stick with the basics of how to put a popup on your site.
Step Two: Add your WordPress form to Popup Maker
For this tutorial, I’ll be making a popup that will open on my home page. After you’ve had some time to familiarize yourself with Popup Maker, you can create popups requesting registration, informing viewers of upcoming events, etc. For now, let’s put in some placeholder text and link this popup to a previously made contact form.
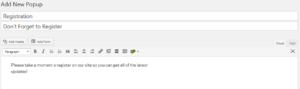
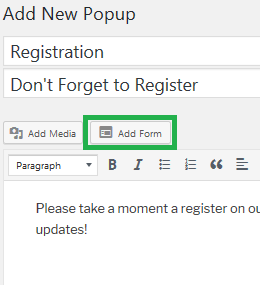
First, put in some placeholder text and link this popup to a previously made contact form. Once you have your popup text the way you want it in the rich text editor, adding any Ninja Form is very simple. With both Popup Maker and Ninja Forms installed side by side, you’ll see an “Add Form” button just above the text editor options:
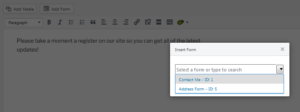
Click Add Form to see a list of all your Ninja Forms:
Now that we have your popup form created, let’s set up when/how it will be presented to your guests.
Step Three: Configure the Popup settings
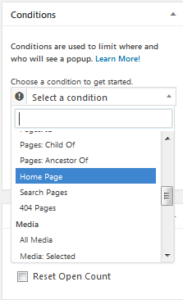
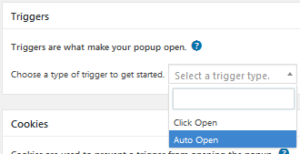
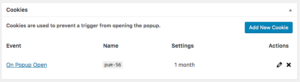
The last three actions are to set your conditions, triggers, and cookies. Use the options to determine how and when your popup opens.
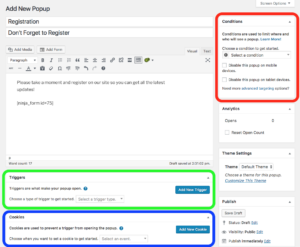
To make sure the same popup doesn’t arise everywhere, I’m going to set the condition to only show on the home page:
…and the trigger to automatically open when the page loads:
Finally, set a cookie that will tell the popup not to open again after it’s already been presented once. Don’t be that website that spams popups, please 🙂
Once you have looked over all of your work and you are happy with it, hit “Publish” in the right-hand column. You should now have a very basic popup form that opens on your homepage with a simple registration form on page load. Congratulations!
The Ninja Forms membership unlocks even more tools to make your website pop forms even more powerful and there a many additional add ons you can explore to help you create visually appealing and sophisticated forms like a pro.
Sponsored Content: This post is sponsored content and the placement has been paid for or contains affiliate links. For full information, see our terms of use


