Make the most of the Ninja Forms Plug In on your WordPress website, to integrate professional and sophisticated forms into your website. Built in forms makes for a seamless customer experience and allow them to contact you without them needing to navigate away from your page. Translating into more leads and more sales.
1. Change the font size of your WordPress form
When it comes to font customizations of your WordPress form, you want to ask yourself a question if you want to make changes across all forms or if you want to make changes on the individual form.
If you want to make changes across all your forms, you want to use Styling settings under the Ninja Forms menu. Any font styling changes you make here will affect all your existing forms and any future forms you’ll create. You also want to make sure that Opinionated Styles are set to None under the Ninja Forms > Settings.
If you want to make styling changes on a specific form, you do that by navigating to Ninja Forms Dashboard and selecting the specific form you want to style. We will come back to this later in this post.
Change font size for all form field labels across all forms
If you want to change the font size of the labels of all form fields, you are globally changing the font size. This can be done by navigating to Ninja Forms > Styling > Default Field Styles > Label Styles > Font Size. This will apply the change to your font size to all form field labels. It does not affect the form title or other elements on the forms that are not fields.

Change font size for selected form field labels across all forms
Want to make text large for specific form field labels than for the rest of the form field labels? Then, you want to navigate to Ninja Forms > Styling > Field Typ Styles > Select a Field Type > Label > Font Size.

Here, you want to select the specific field type you would like to make a change. As an example, we select the Submit button field from the Select a Field Type dropdown. To change the font size of the button, text color, or the background of your submit button you’ll navigate to Submit Element.
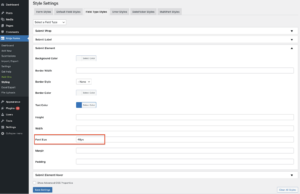
Change the font size of form labels for a specific form
The Styling settings we showed above are used if you would like to make changes globally, across all the forms. However, if you want to make changes to the individual form, navigate to your Ninja Forms Dashboard and select the form you wish to make the font customizations. Select the specific form field and open the Style settings > Label Styles > Font Size.
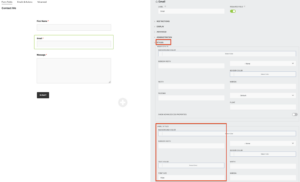
Here, you can also change the color of the text, and more. If you don’t find more styling options, you can always turn on Show Advanced CSS Properties and write your own CSS rules!
Change the font size of the form title on your form
If you want to make any font changes on your form title, navigate to the Advanced tab on your form builder and select Styles > Title Styles. Here, you can change the font size, font color, and other elements of your form title.

2. Change the Font Family in your form
Are you looking for a simple way to change the font family on your form? Layout and Styles add-on saves you the hassle and lets you do the change in a matter of a few minutes using the Styling settings.
First, make sure you enable Developer Mode by navigating to Ninja Forms > Settings > Advanced Settings > click ‘Dev Mode’. Enabling this feature will give you access to advanced settings within Ninja Forms. Next, navigate to Ninja Forms > Styling > Default Styles > Element > click ‘Advanced CSS’ and insert font-family: <whateverTheFontFamilyIsCalled>;
That’s it! You’ve just changed the font family of your WordPress forms and learned how to change the font size of your contact form! Didn’t think would be that easy, did you?
3. Change the text color in your forms
Your method of changing the text color on your form will vary based on if you want to make changes globally across all your forms or if you want to make changes on the specific WordPress form.
Changing text color on a specific form
If you have the Layout & Styles add-on installed on your WordPress form, all styling changes are made within your form builder.
Some styling rules can be set by navigating to the Advanced tab of your form > Styles. Here, you’ll find more generic styling settings.
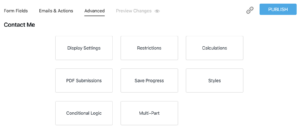
To change the text color of specific form field labels, you’ll want to navigate to that field and open Styles. To change the text color of the form label, you select Label Styles.

Changing text color across all forms
You can change the text colors of your form fields in WordPress forms by navigating to Ninja Forms > Styling.
Depending on if you want to change the color of the text on all forms at once or only specific form fields on all forms, you’ll select the Default Field Styles (global) or Field Type Styles.
Please note that if you don’t find the styling settings, you can always enable the Advance CSS and write your own CSS rules for further customizations.
4. Change the font in your email confirmation
While Ninja Forms does not install new fonts on your server, you can edit your Email Action and use the HTML/Source button (< >) in order to apply CSS to change the “font-family” of your text.
As an example, we implement a Google Font. After choosing a font, we copied the embed link.

Now we head to our Email Action and use the HTML/Source button (< >)
to paste that embed link.
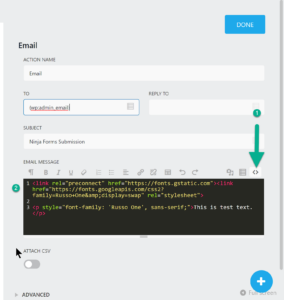
The last thing we want to do is add the CSS to change the font-family as shown below.
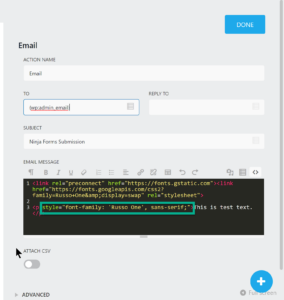
For any font customization including font size or text color, you’ll want to use the same HTML/Source button. To learn about how to easily customize your email, check our article Learn How to Easily Customize Your Ninja Forms Email!
That’s it! If you followed the steps above, you can now change the font of your confirmation message.
5. Form styling tip you must know!
You don’t need to have coding skills or be a developer to make styling changes on your form. However, it is always helpful to know the definition of Label Styles, Wrap Styles, and Element Styles. Rather than talk about it, we created a simple picture that will be very useful to you when applying any styling rules to your form!

Wrap Styles – styling space surrounding the Label
Label Styles – styling Label (identification of field) only
Element Styles – styling of a field where you insert a text
6. Bonus: Adding font awesome to labels
Sometimes you want to add little extra something to attract a visitor’s eye or spruce things up for your regular guests. Font Awesome for Ninja Forms is the perfect way to add a bit of visual flair to your form fields!
Note: The following steps assume that you have opinionated styles activated, or a solution enqueuing Font Awesome. For easy documentation on how to activate opinionated styles, please see the Styling Your Forms.
You can add Font Awesome icons to any field label that exists in Ninja Forms. As an example, we will show you how to insert the envelope icon into the email form label. Keep in mind, that each Font Awesome icon has a bit of code contained within the <i> tag. For this specific envelope icon, our <i> tag is:
<i class=’fa fa-envelope’ aria-hidden=’true’></i>
Here’s our Email field settings window:
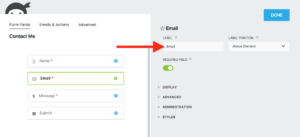
See the big red arrow? That’s where we’re going to be pasting the Font Awesome code snippet. Just click to place your mouse cursor to the left of the word Email, and paste. I’d probably place a space in there too, just for the front-end aesthetic.
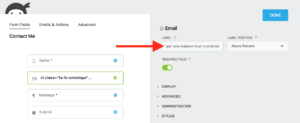
That’s quite literally all there is to it. Here’s what we have on the front-end view as users will see it:
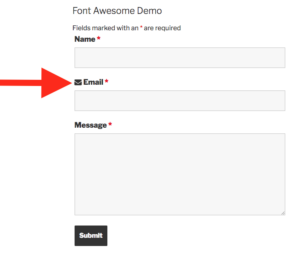
That’s it! Font Awesome icons are easily styleable if you know any CSS at all. If you don’t head over to their website and take a look at their getting started material and documentation. It’s really not that hard at all!
Please note, at this time our form buttons or form fields do not include Font Awesome capability and you can only add Font Awesome icons to your form labels. If you want to read more about Font Awesome and Ninja Forms, make sure to check our article Simple Steps to Unlock Font Awesome for Ninja Forms!
The Ninja Forms plug-in makes it more convenient than ever to create on-brand forms for your site and proves this really can be a hassle-free process. You can even enhance your forms by opting for the Ninja Forms membership or additional add-ons, enabling you to further create visually appealing forms that turn site visitors into paying customers.
Sponsored Content: This post is sponsored content and the placement has been paid for or contains affiliate links. For full information, see our terms of use

